
DX API Guides for ThingPark Wireless
As part of Spark’s Connected IoT services, we have gathered useful information to help subscribers set up and use their devices via Spark LoRaWAN and partner services. One of the services offered to customers is access to the Actility ThingPark Wireless (TPW) DX API’s, and this page shows how to perform many common & useful tasks using the TPW various DX API’s. The complete online documentation for all of these DX API’s can be found at:
Actility’s TPW platform also provides a convenient Swagger UI for performing administration tasks, performing queries, and exploring the DX API functionality. Guides for some of these tasks is presented here, and for the two DX API’s that a subscriber would most commonly use. These are:
- DX Admin API – token generation and other administration tasks to do with using the DX API’s themselves;
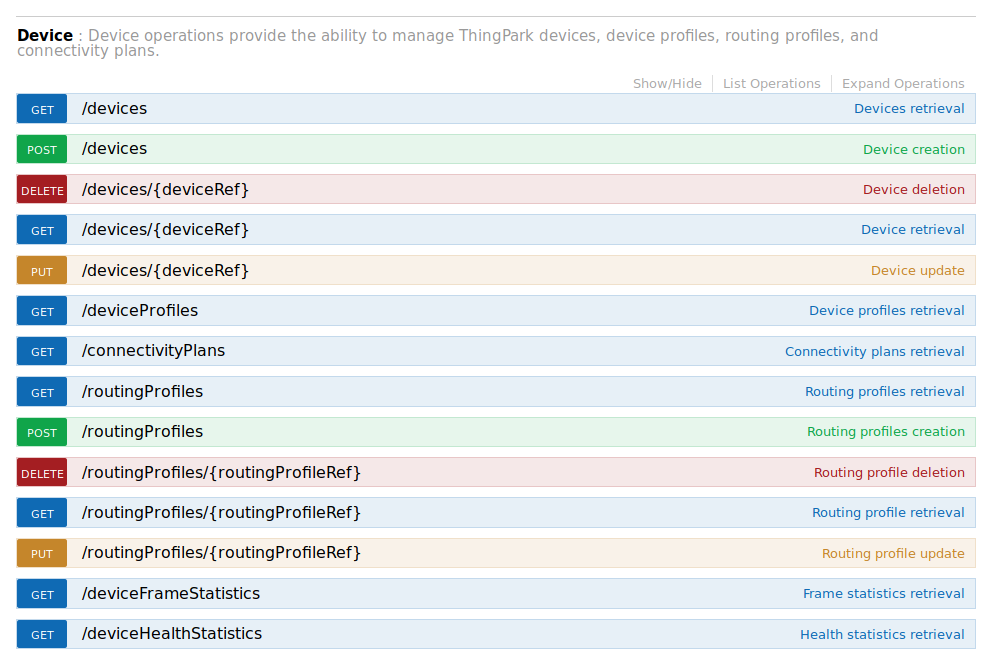
- DX Core API – device and gateway provisioning, status, sending downlinks, application & device security, and user & subscription management;
This guide covers:
Generating DX API tokens – authentication tokens are required to access DX API functionality
Provision new end-devices – as an alternative to using the TPW Device Manager to provision new end-devices, the DX Core API can be used, and this guide demonstrates how to do this using the convenient Swagger UI wrapper.
Sending downlinks to end-devices – shows how to use either the Swagger UI wrapper to post downlinks to your end-devices, or via the command-line using the
curlutility.ThingPark Wireless DX Bridge – Actility and Spark can provide a DX bridging API to connect ThingPark Wireless to other enterprise-grade IoT services and solution providers
DX Admin API 2.0.2 & DX Core API 1.8.1 (Preview)
Actility has recently released the ThingPark Wireless (TPW) latest DX API version - DX Admin API 2.0.2 & DX Core API 1.8.1, available as preview for user evaluation. The latest DX API will in time be made the mainline current version as the current mainline version is progressively retired. For guide to use the latest (Preview) release version of DX API please follow the guide at the following link:
For guide to use the current mainline version of DX API please continue with the following sections of this guide below.
DX Admin API Guides
To use the DX-API’s, first a token must be generated and this can be performed using the DX Admin API. The generated bearer token is required to authorise access to the DX API functions. The next section of this set of guides contains instructions for generating tokens, as well as links to additional information. This guide uses the Swagger UI, though this is not the only method to generate tokens.
The URI for Swagger UI wrapper for the DX Admin API is:
and following this link should load a page that is similar to that shown in the following figure:
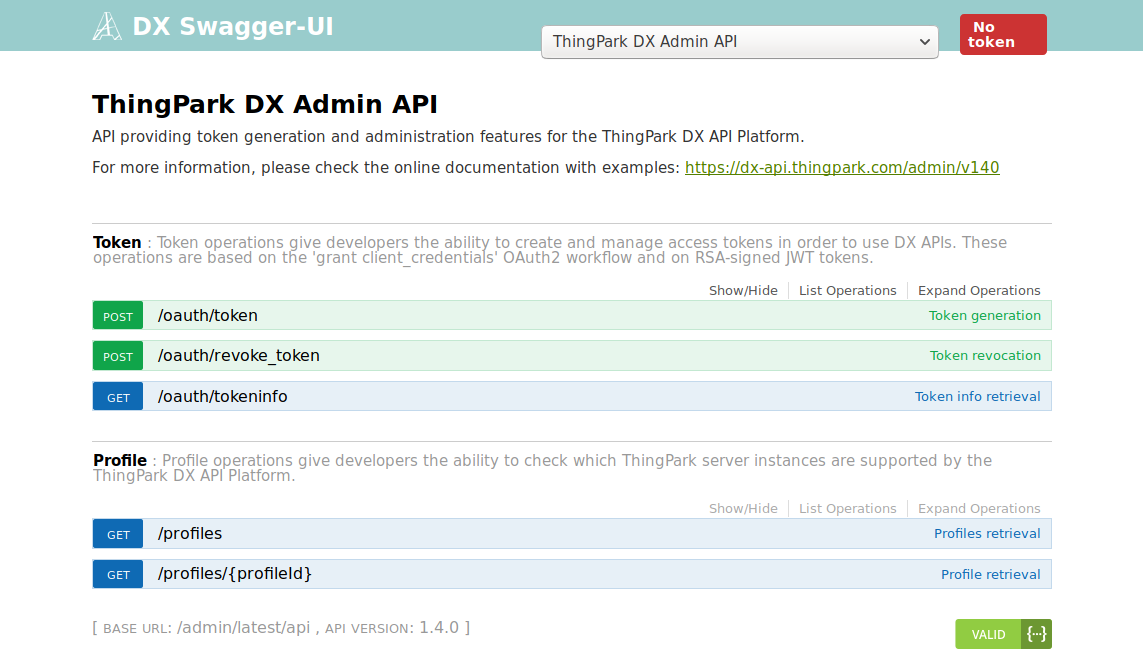
The DX Admin API does not contain many functions, and is primarily used to just generate and manage the bearer tokens that are needed to access and use the other DX API’s, and their Swagger UI wrappers. Additional administration tasks allow setting token expiration periods, revoking tokens, retrieving customer details, and querying profile information.
Token Generation
To use the DX-API’s, first a token must be generated as this is needed to authorise access to the API functions. Our preferred way to do this1 is to use the Swagger UI
And this will display a page that will be similar to:
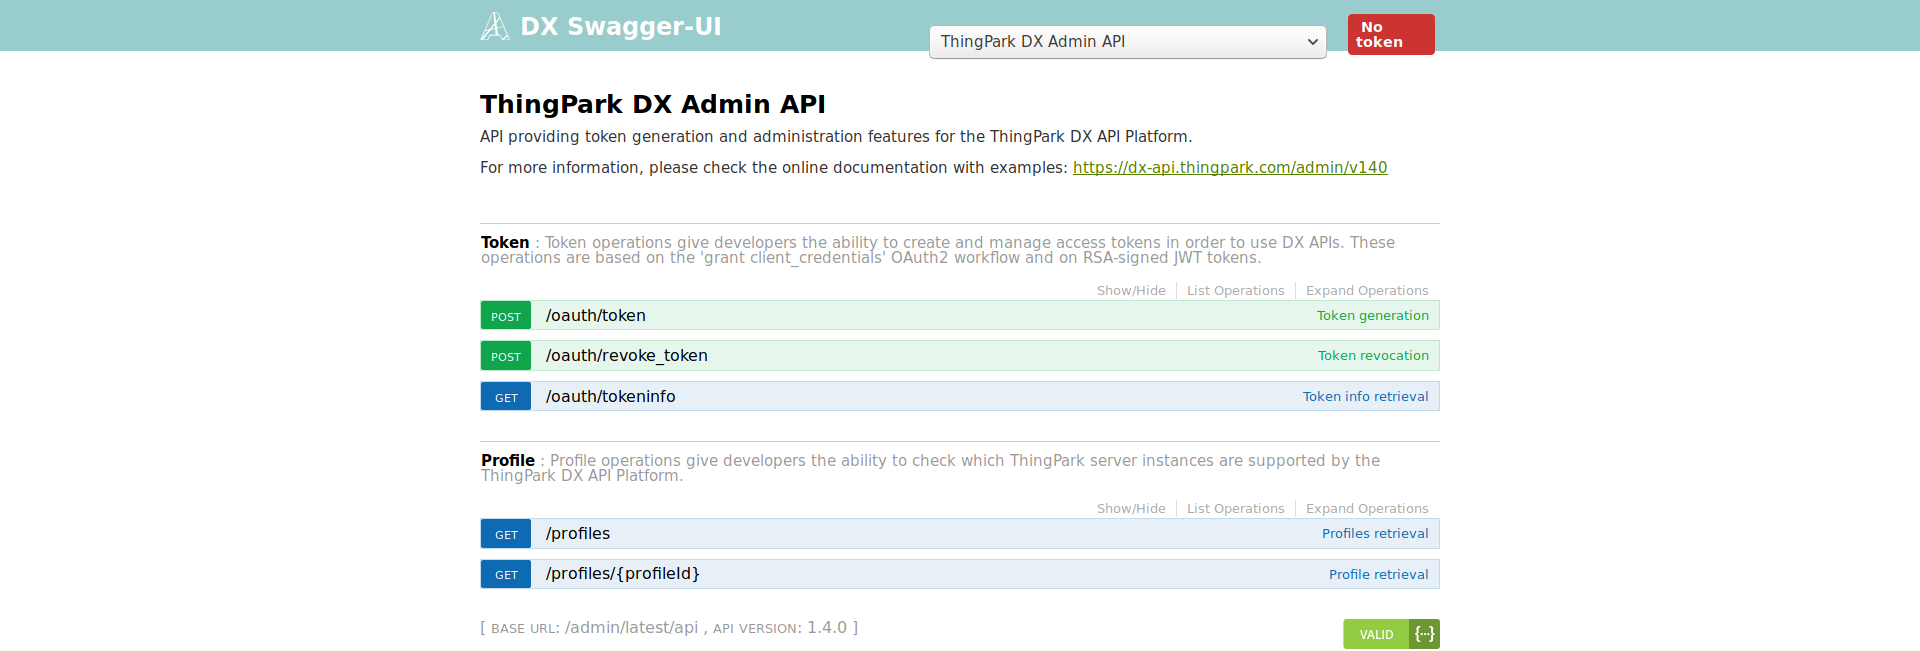
To begin generating a bearer token, select the relevant web-form by clicking on:

to expand the token generation web form (see further down this section to see the full Swagger UI token-generation web-form).
Setting User Credentials
The bearer token will be linked to the TPW account that you used to create it, and this account will set what DX API functionality will be available when using that token. There are four “roles” used by the DX API’s:
- SUBSCRIBER
- VENDOR
- SUPPLIER
- OPERATOR
and you will see these mentioned as part of the documentation and descriptions of the DX Core API functions. Presumably you will be using your user account which is tied to a TPW subscriber account, and you will need to provide this information when generating a token. First, set the ‘grant_type’ to client_credentials:
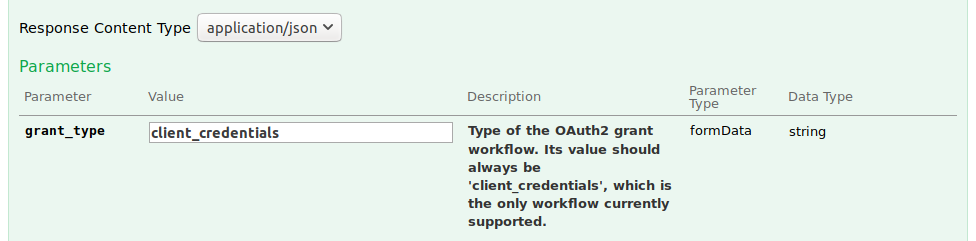
client_credentials.Then set the ‘client_id’ to iotnz-api/ followed by your (subscriber-account) login email-address; i.e., iotnz-api/<your subscriber email address>, and then enter the password for your subscriber account in the ‘client_secret’ text input field:
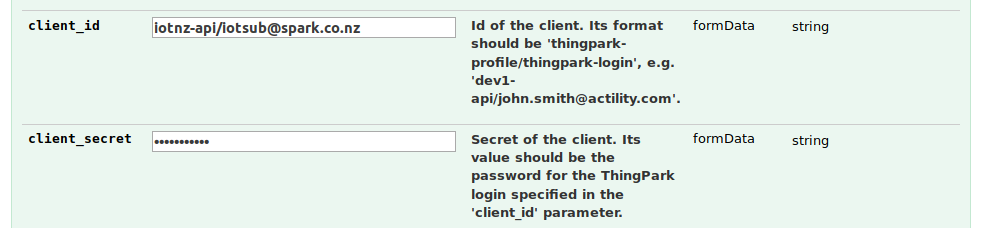
iotnz-api/ followed by your subscriber login email address; i.e., iotnz-api/<your subscriber email address>, and then enter the password for your subscriber account in the ‘client_secret’ text input field.Check the Target Profile and Server Address
Make sure that you are using the correct “target profile”; i.e., ThingPark server instance, as your credentials will not be accepted if this is incorrect. For Spark IoT customers, the correct target profile is iotnz-api, and the ThingPark server domain name to use is:
https://dx-api-au1.thingpark.com/Please note that the above address contains au1 in the domain name, as there are other servers for other regions.
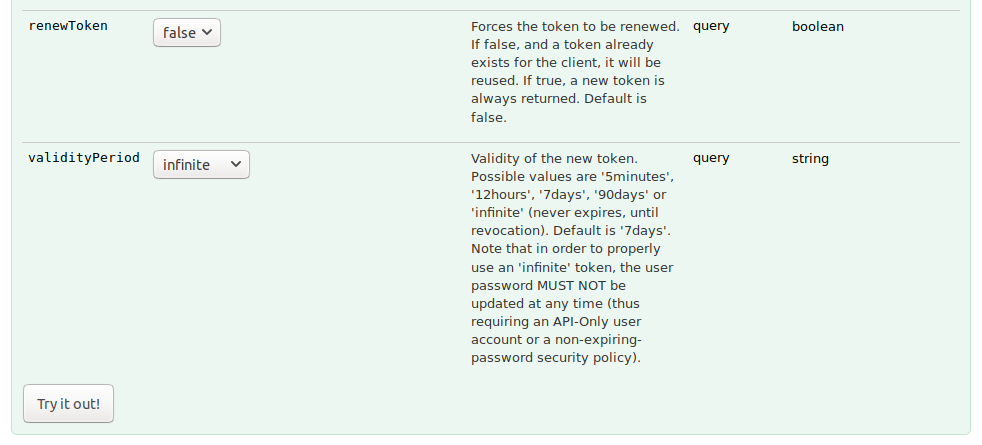
Token Renewal and Lifetime
You may have previously generated a bearer token, and the ‘renewToken’ field allows you to choose whether you want to reuse the existing token (if it is still valid, and by setting renewToken: false). For the next field, it may be safe to use validityPeriod: "infinite" period for a user of a TPW subscriber account, and while evaluating Spark LoRaWAN. But this could be a security-risk, especially for more priviledged accounts or when there are a lot of devices and/or users.
Now that all fields of the form have been filled in, press Try it out!
Security and Token Lifetimes
Spark customers with VENDOR accounts, or other accounts with a high privilege level, should not use validityPeriod: "infinite" as this setting will dramatically increase the probability that the token will:
- become compromised; or
- be used in a way that accidentally causes damage,
and an account with VENDOR privileges can amplify the potential for causing damage to a running system.
In Summary
The full, completed web-form should look something like that in the next figure:
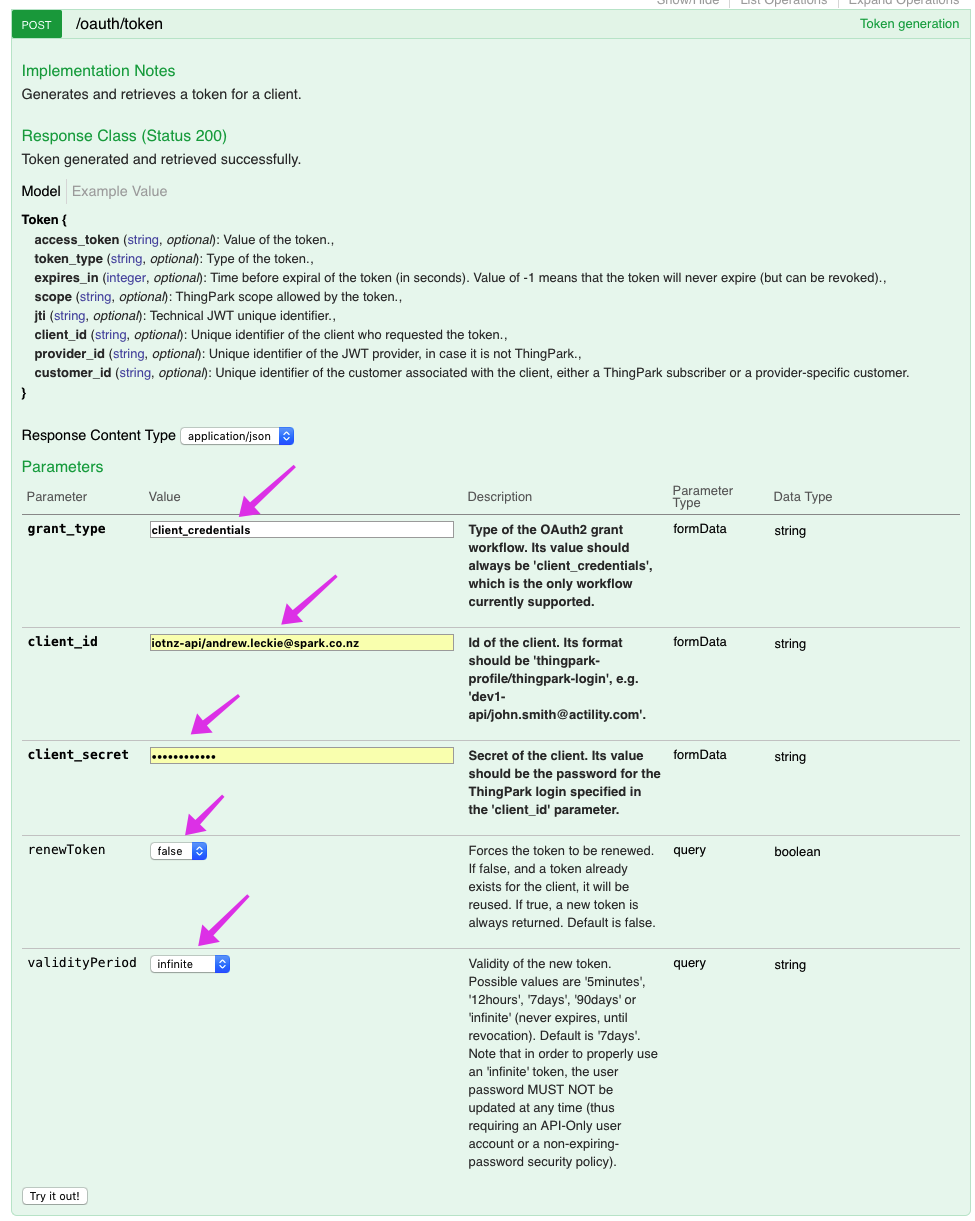
Pressing the Try it out! button will POST this request for a token.
Token Generation Succeeded
If token generation was successful there will now be a green box at the top right of the page showing ‘Token set’ (see Figure 8), along with the additional responses.

To access the functionality of the other DX API’s, you will need this token, and when it is active it will in the current page-link bar and the bearer token will be the value of the apiKey; e.g., the xxx (but much longer, and you should keep the actual value private) of the following example link:
https://dx-api-au1.thingpark.com/admin/latest/swagger-ui/index.html?shortUrl=tpdx-admin-api-contract.json&apiKey=xxxWhile on the same page, after generating a bearer token, there will be information showing what parts of the DX API’s that you will now have access to:
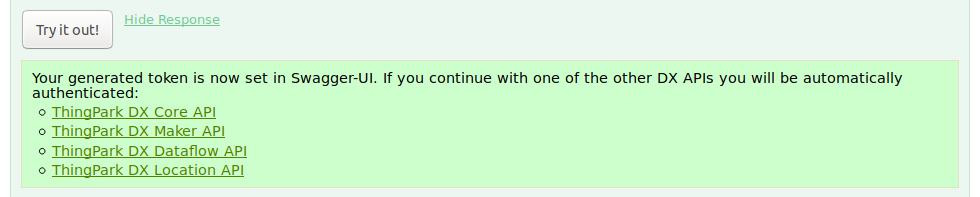
and you can now explore the other functionality of the DX-API’s. Below this is the information required to repeat this task using a single HTTPS POST:

The curl command is given, and evaluating this using an appropriate command shell (if curl has been installed on your system) will generate the responses that are shown below the Request Url field.
DX Core API Examples
This section shows how to perform common administration tasks using the DX API’s – both from the command-line, and using the Swagger UI wrappers for the DX API’s. For new DX API users, the Swagger UI is probably the easiest way to explore and learn the DX API’s. And each time after clicking the Try it out! button, you will be presented with a curl command to perform the same task. This could then be copied-and-pasted into an appropriate script, if setting up script files to automate administration tasks.
The following subsection covers setting up tokens for using the DX API’s. If you have yet to generate a bearer token, then there is a guide further up this page that shows how to do this. Documentation for the DX API Platform, inlcuding the DX Core API is provided by Actility:
and it may be worth reading the platform documentation if you are not familiar with any of the following topics: HTTP requests/responses; REST API’s; OpenAPI/Swagger contracts; and security tokens. The remainder of this section shows how to:
- Set up authorisation tokens
- Obtain a list of users for a subscriber account
- Provision a new device using the DX Core API
- Post Downlinks to End-devices
and shows how to do this using both the Swagger UI wrapper, and using the curl command-line tool.
Authorisation
A guide for generating bearer tokens is given above, and this information is also available from the official DX Admin API documentation as well. After generation of, and setting2 a valid bearer token you will now have access to additional DX API’s, including the DX Core API, which requires a valid bearer token. The Swagger UI allows you to quickly see whether you have a valid & active bearer token, as can be seen in the following figure which shows ‘Token set’ in the green box of upper right corner:

And this is required to access/use the functionality of the Swagger UI wrapper for the DX Core API. If you are not using the Swagger UI, then you will need to enter the bearer token details into the header of any HTTP(S) commands issued to the DX API’s; e.g., by using utilities like curl, or perhaps via GUI applications like PostMan.
To avoid having to manually enter your bearer token (for the Swagger UI wrapper of DX Core API), select ‘ThingPark DX Core API’ from the drop-down box, to change from ‘ThingPark DX Admin API’. Your browser will “remember” your token, so you should still see ‘Token set’ when using this method to switch to the Swagger UI wrapper for the DX Core API. A direct link is also provided below, along with documentation for the DX Core API:
- https://dx-api-au1.thingpark.com/core/latest/swagger-ui.html
- https://dx-api-au1.thingpark.com/core/latest
Query Devices
After completing the steps that were required to generate a bearer token, you should now be able to request a list of all end-devices for the subscriber account associated with your user account.
Swagger-UI Method to Query Devices
Post Downlinks to End-devices
To send a download to a provisioned and connected end-device; e.g., for DevEUI: 3930323558376F03, and to port 0x01, then issue the command:
$ curl -H "Content-type:application/json" -X POST "https://api-au1.thingpark.com/thingpark/lrc/rest/downlink?DevEUI=3930323558376F03&FPort=01&Payload=65"And if successful, the response will be similar to:
Security for Downlinks
The method outlined above is not secure, as it potentially allows anyone to send downlinks to your end-devices. Ideally, this approach should only be used for testing & early stages of development, and end-devices would use the secure AS tunneling functionality to send downlinks.
ThingPark OSS API’s
The ThingPark OSS API’s provide the back-end functionality to control the TPW applications:
- Device Manager;
- Network Manager; and
- Connectivity Manager.
They are accessed via Single-Sign-On (SSO) authentication, after first authenticating using the SMP API, which generates the required access code. The SMP API is also used to authenticate subscribers for access to their subscriber accounts and TPW applications. If you are in need of the capabilities provided by the OSS API’s, then contact us for more information.
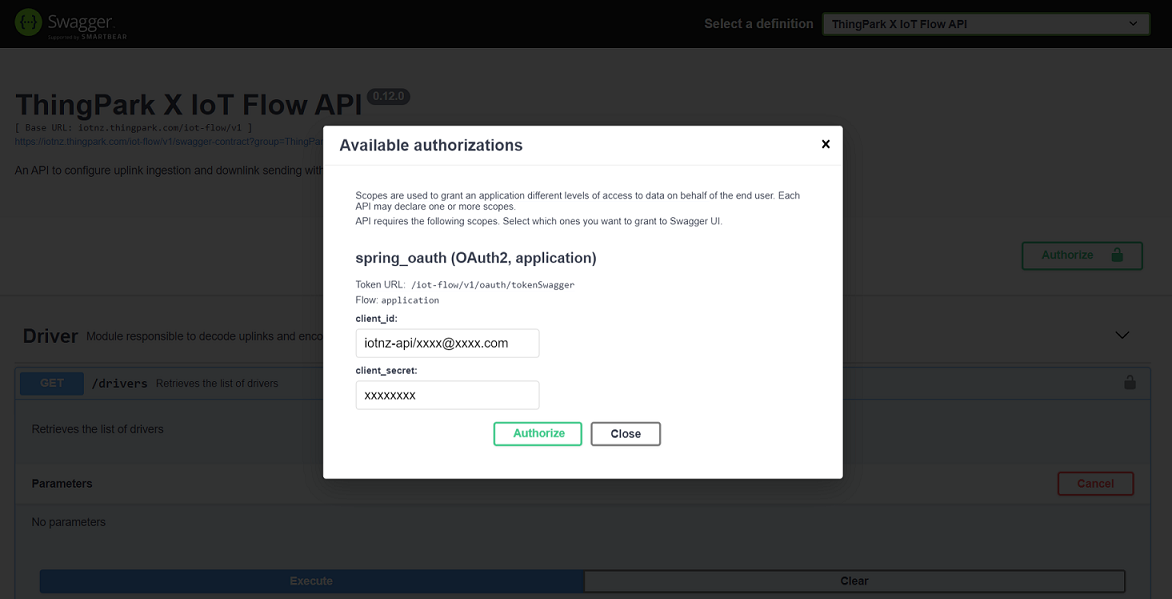
ThingPark Wireless IoT Flow
IMPORTANT NOTICE
Please note ThingPark X Dataflow service has been discontinued by Actility. It is replaced by IoT Flow service. For more information and to evaluate the IoT Flow service please see below:
For more information on IoT Flow please refer to the below:
Please authorize your access on the IoT Flow Swagger UI to gain access to the usage of the IoT Flow APIs. Please see below example of the login method. Use the same user email address login and password credentials you are using for your ThingPark Wireless account. Note: Your user email address login should be prefixed by “iotnz-api/…” as shown below).
For further information on ThingPark X IoT Flow, please contact us if you require DX IoT Flow functionality.
There is also the Get Started page but this generates tokens that expire after one month, and this method is not covered here.↩︎
Using the Swagger wrapper to the DX Admin API automatically sets up your web browser to provide the bearer token for the Swagger UI wrappers of the other DX API’s.↩︎