
Using Your ThingPark Webportal
Actility is the Spark partner that delivers the ThingPark Wireless (TPW) backend IoT platform. The TPW platform is used for managing end-device connections, and routing of traffic between end-devices and a subscriber’s Application Server(s) (AS).
Web Portal
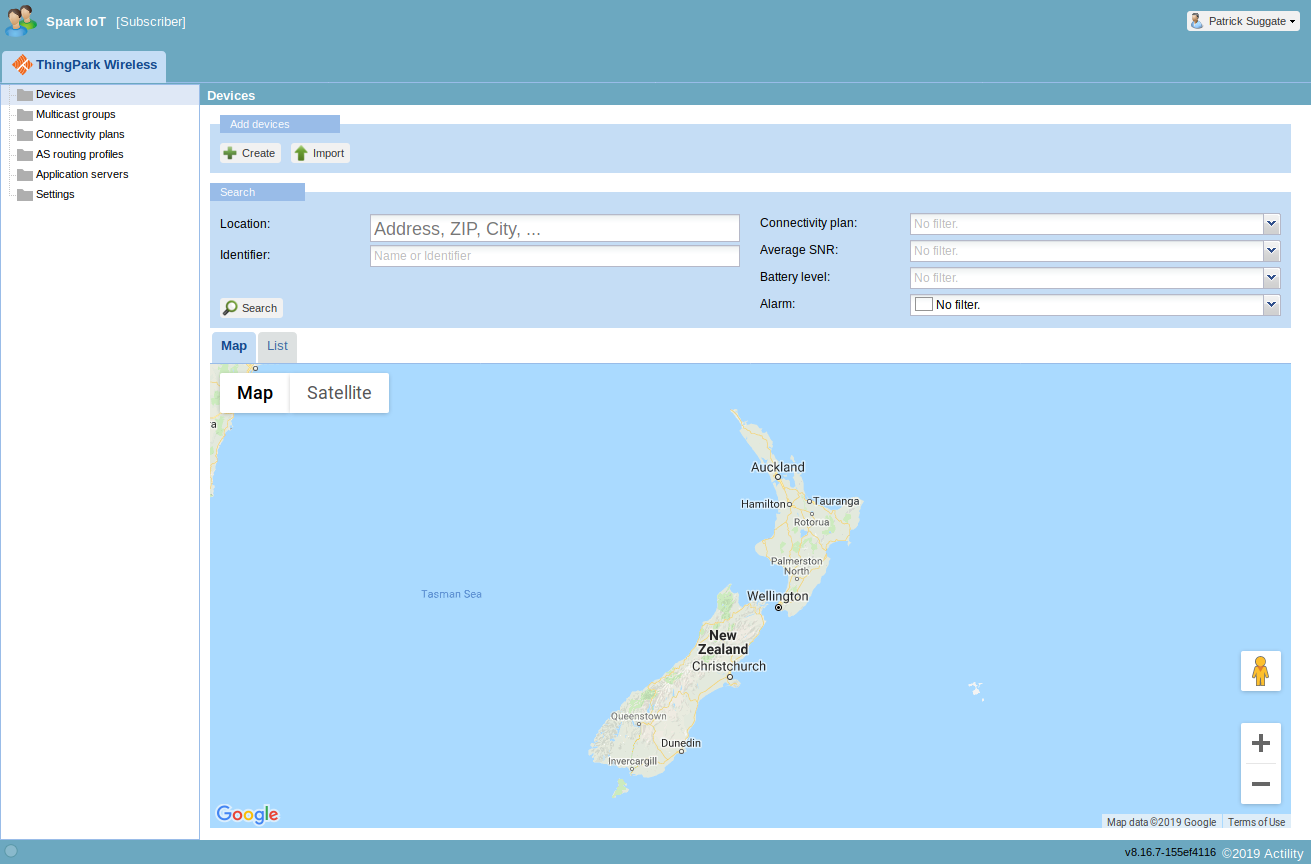
There are several interfaces to the services provided by the TPW platform, and this page contains guides for using the TPW webportal to perform tasks that are subscribers will typically have to perform to set up and use their end-devices. A successful webportal login will result in a webpage that will be similar to that shown in the following figure:
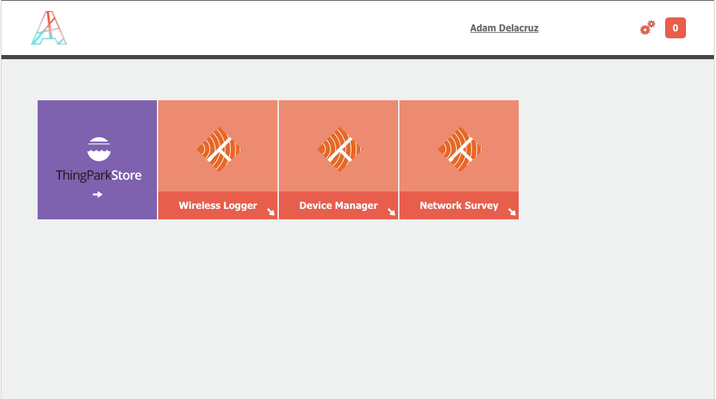
From here you can access TPW functionality for your subscriber account; for example, to perform tasks such as:
- Provisioning a new End-Device
- Set Up the Device Routing Profiles
- Configure an Application Server
- View Message-Traces using Wireless Logger
- Perform a Network Survey (see footnote1)
Log in to your customer portal using the following link:
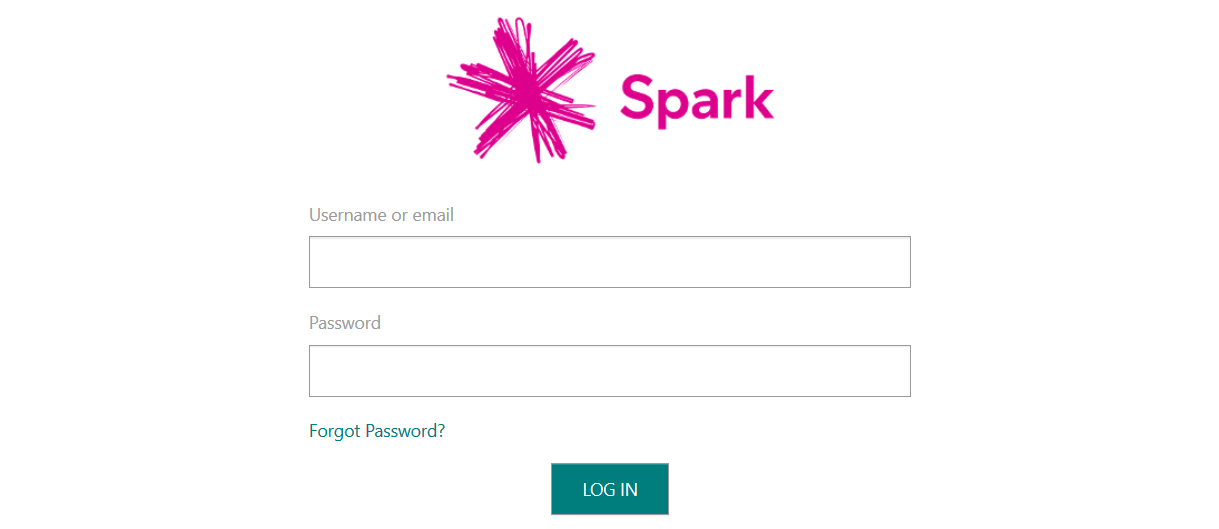
and Figure 2 shows the login screen, and here you need to enter the email address that you provided for your Spark LoRaWAN login, along with the password that you set during the account activation process.
Browser Compatibility
We typically use either the Firefox or Chrome web browsers with ThingPark Wireless, and some versions of the Microsoft web browsers have difficulty with these web-applications.
Connect a New End-device, Application Server and Routing Profile Setup
A new LoRaWAN end-device can be added to the Spark Connected IoT network using the TPW Device Manager web application, accessible from the TPW webportal. The application server and routing profile is also configured through the TPW Device Manager.
Configure an Application Server
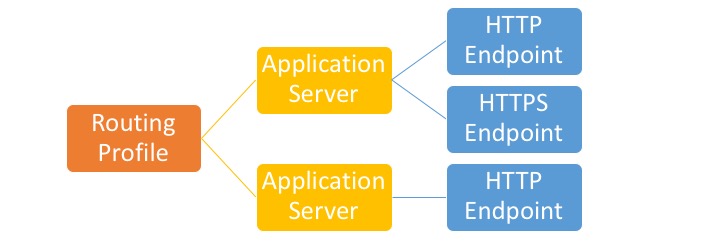
Application Server contains configuration information on where your device will forward the traffic. It has a 1 to MANY relationship with IOT Application Endpoint (HTTP, HTTPS or Kafka). Don’t confuse the application server as the actual server that will consume your data. In Thingpark, this is just another layer of configuration as shown in Figure 3 .

Creating a New Application Server
To create an application server, you must select the Application servers from the sidebar, as shown in Figure 4 below:
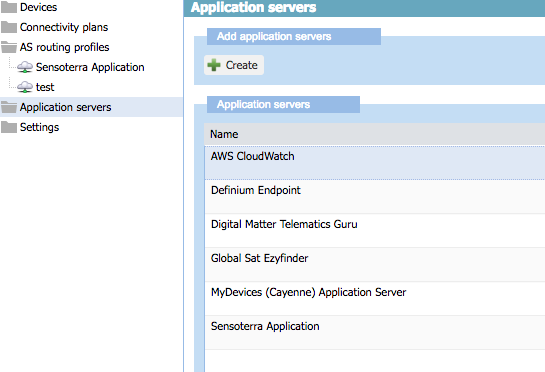
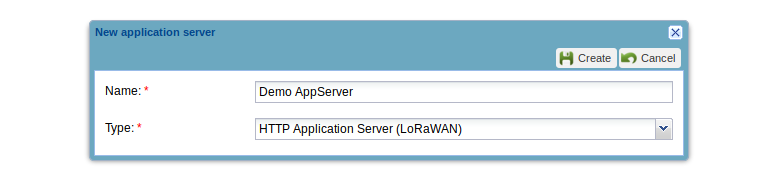
Application servers in the sidebar, then select Create to launch a dialogue that will allow you to add a new application server to your account.Click the Create button and a popup window will appear as shown below:
When you hit Create, it will present you with a page that allows you to Add a route to your end-point, and this button is highlighted in the following image:
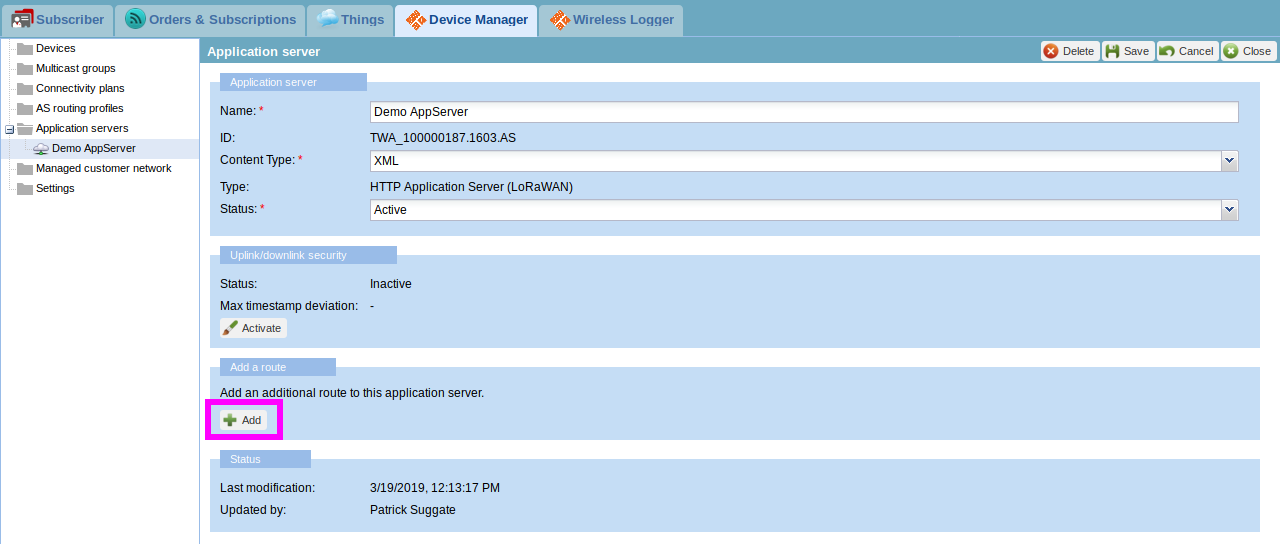
Add button (within the Add a route section of this webform) to set up a route to an Application Server end-point.Once this button has been pressed a new panel is added to this AS-creation webform, allowing you to configure the route to your Application Server (AS) end-point, as shown in Figure 7.
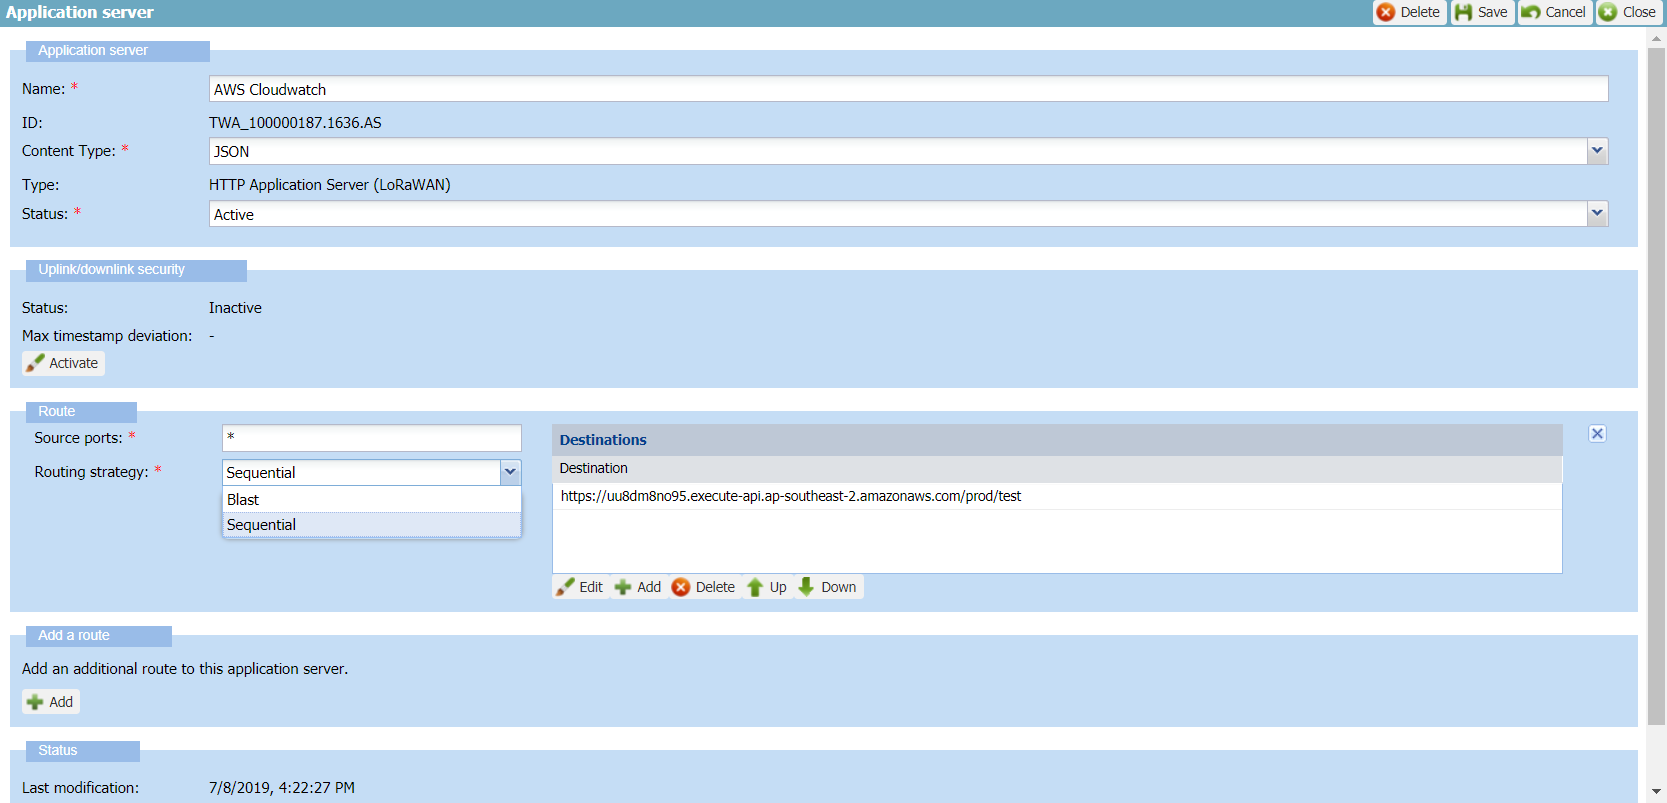
- Content Type This field specifies the device data packets’ communication content type that is accepted/expected by the recipient Application Server.
Common Mistakes
A mistake that is commonly made, during this process of setting up an Application Server, is forgetting to set the correct Content Type, which defaults to XML. This may cause problem if you are expecting a JSON data; for example, so change this to the data format that is expected by your AS.
- Status This field allows the user to activate or deactivate the communication channel to and from the application server. When the application server is deactivated, uplink frames from its associated devices are not forwarded to the application server and the application server is not able to send downlink payloads to associated devices. When activated, uplink frames and downlink frames can be sent to and from the application server.
The Source ports field allows the source (incoming) port to your AS to be whitelisted. And one or more Destinations can be added, and these are typically HTTP or HTTPS end-points. The Route section of this window lets you choose a Routing strategy from either:
- Sequential; or
- Blast.
Sequential means, if there are 10 destinations configured, it will try it one by one from top to bottom until 1 of them return 200 OK. Blast on the other hand will just send the same message to all 10 of them.
Configure the name, payload protocol (e.g., JSON), source ports, routing strategy, destinations/end-points and perhaps an additional route to this AS. Then complete this process for adding a new AS by clicking the Save button.
Set Up the Device Routing Profiles
Application Routing Profile contains configuration information on where your device traffic will be forwarded. It has a 1 to MANY relationship with Application Server. Don’t confuse the application server as the actual server that will consume your data. In Thingpark, this is just another layer of configuration. As you can see from the diagram, Application Server can be configured to forward your messages to 1 or more HTTP(S) or Kafka end points.
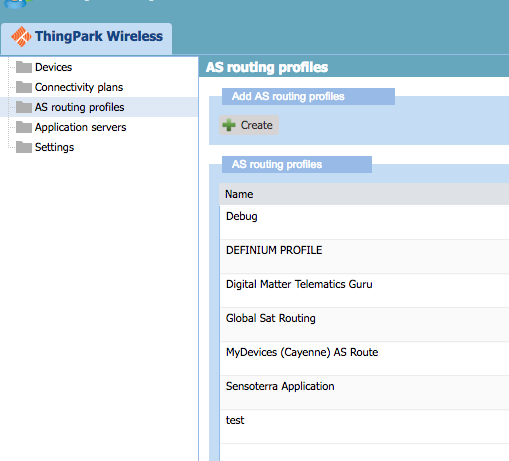
To create a routing profile you first select AS routing profiles from the sidebar, as shown in the image below:
Click the Create button and a popup window will appear as shown by the following figure (Figure 9):
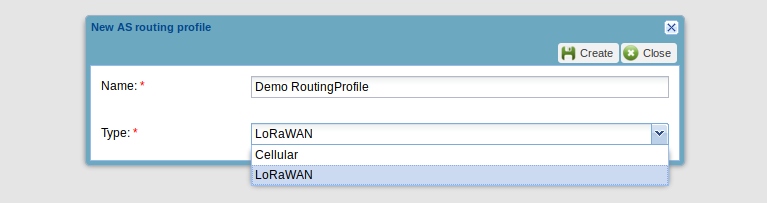
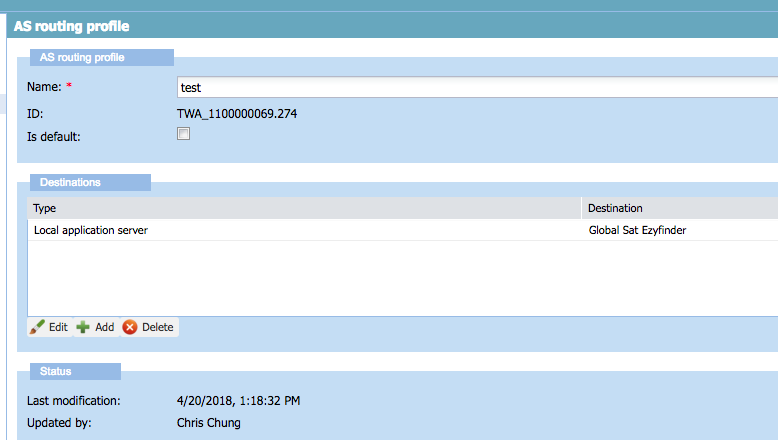
When you hit Create, it will present you with a page that allows you to add, edit and remove application servers, and this is shown in Figure 10.
Device Provisioning
Provision a device2 using the ThingPark Wireless Device Manager so that it can connect using Spark LoRaWAN.
Provisioning of the device is done using the ThingPark Wireless web portal. The Spark network won’t recognize your device until you register the end-device to your subscriber account, for the Spark/Kordia network. To register an end-device you will need its DevEUI, AppEUI and AppKey so that the device can first join the network, via OTAA (Over-the-Air Activation), in order to successfully send and receive messages. You will also need to configure a couple of parameters that will affect the way your device behaves once it has joined the network.
Follow the steps below to provision a device.
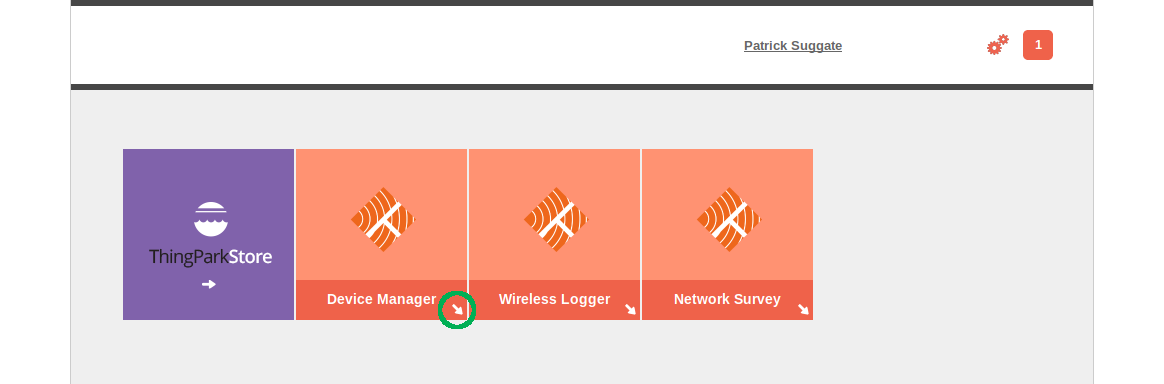
Now that you have logged in to your your TPW web portal, you should now see the applications included with your subscriber account, and this should look similar to that shown by Figure 1 . To provision a new end-device, then select the Device Manager application, as shown in Figure 11 below.
This will trigger a new/popup window for the Device Manager application. Figure 12 shows the default view after launching Device Manager.
Notice that by default the Devices item is selected, from the list in the left hand panel. If it is not selected, then select it, before clicking the Create button. This will show a popup window as shown in Figure 13 .
You need to fill in the necessary information for the device. Fields with the red asterisk are required fields.
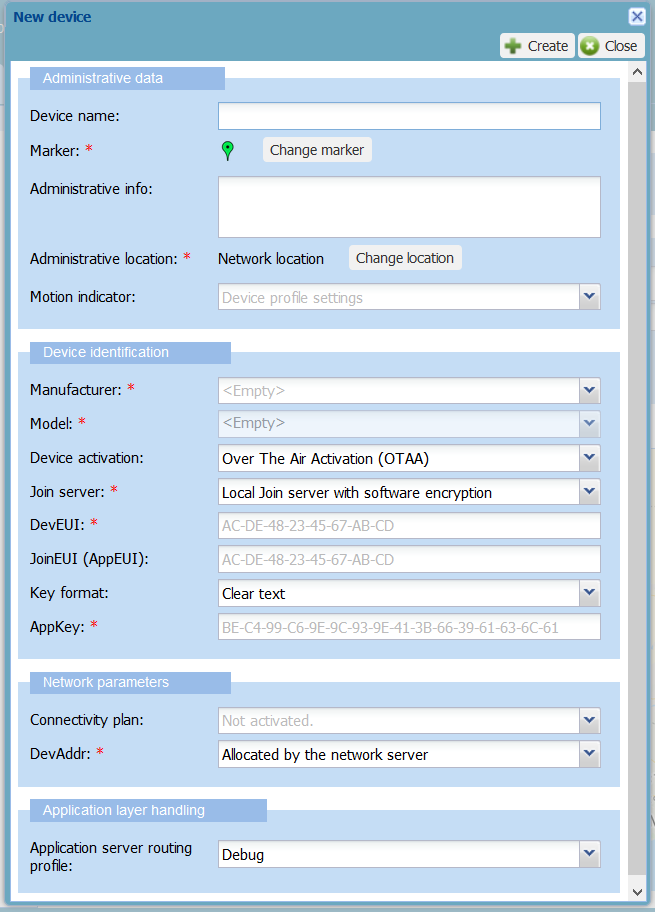
Referring to the image shown in Figure 13 , the following list explains the meaning of each field of that dialogue box:
Device name Enter a name that helps you easily identify the device on your IoT network.
Administrative location By default, the network location is set for the device.
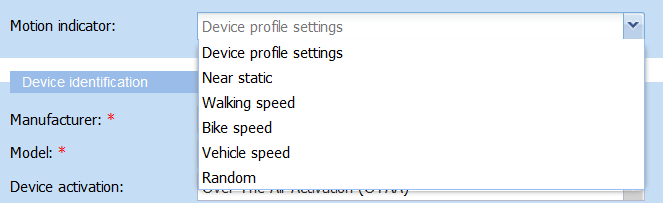
Motion indicator Specifies if the device are static in nature or mostly a moving device, and the following image shows the different choices:
Manufacturer In the Manufacturer drop-down list, select the manufacturer of the device. If defined by your Operator, the model name is followed by the supported ISM bands. If it is not in the list, contact your Operator, alternatively you may choose to just use a generic(non-manufacturer specific profile) by selecting Generic. Once a manufacturer is selected, it populates the Model list with the device models of the manufacturer.
Model In the Model drop-down list, select the model of the device. If the model is not in the list, contact your Operator. The dialog box is updated with the model configuration. If the model supports LoRaWAN™ 1.1, the dialog box is updated with related parameters.
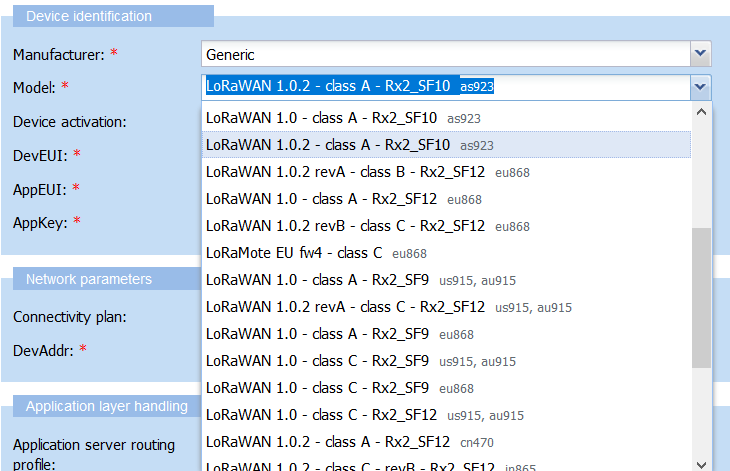
Important
If setting up a generic end-device, then select LoRaWAN 1.0.2 (and typically Class A) for the version – selecting earlier versions of the LoRaWAN protocol will cause the end-device to not operate correctly!
Ensure also that any end-device choice selected from Model list must have as923 band support, as this is the only band that is supported by the Spark LoRaWAN network.
Device Activation Select the mode of activation for this device:
ABP (“Activation By Personalization”) Once provisioned, ABP devices are considered to be “connected,” and there is no addition join process. This requires the device’s (32-bit network) address and its network & application keys to be stored within the device – rather than allocated during a network join procedure. This makes ABP a little less flexible, as well as less secure.
OTAA (“Over The Air Activation”) The preferred and more secure way to connect to Spark LoRaWAN is via a join procedure that generates new encryption keys at each join, and using pseudorandom numbers that have sufficient entropy. The network server also allocates a 32-bit device (network) address when a device joins using OTAA.
Device Activation
The default activation method of the dialogue box shown in Figure 13 is “Activation By Personalisation” (APB, and not shown) but “Over The Air Activation” (OTAA) is the preferred activation method because it is more secure. OTAA generates new network and application encryption keys on each network-join, whereas ABP always reuses the same keys that are stored within the end-device.
Join server Join server mode on which you want the OTAA device to do its join procedure. If you’re not sure, choose Local Join server with software encryption.
DevEUI This information comes from the device itself. Usually, it is written as a label on the packaging, or more often than not, if a device has AT commands, there is a corresponding command to execute to get this information. Please consult your device provider for information on how to get the DevEUI.
JoinEUI (AppEUI) (JoinEUI for LoRaWAN™ 1.1): Global application identifier that uniquely identifies the application provider of the device. It is composed of 16 hexadecimal digits (0 to 9, and A to F).
Key format If you are using a local join server with software encryption and you want to enter the AppKey in clear text select Clear text from the Key format list. If you’re not sure, choose Clear text.
AppKey The Application Key is an AES-128 key assigned by the application owner to the device to encrypt the join communication. Note: If the network server works with an external Join Server configuration, the AppKey box is not displayed in the New device dialog box.
Connectivity plan This setting is used to choose the set of the features & parameters that the network server will use when communicating with, and controlling aspects of the network behaviour of your devices; e.g., message-limits, allowable spreading factors, and Adaptive Data Rate (ADR) settings. The Standard CP will be the best choice in most circumstances.
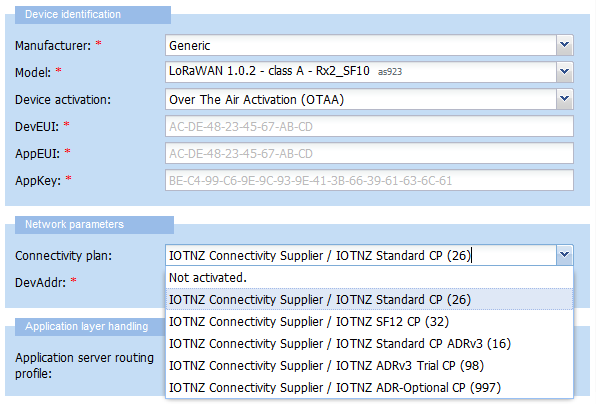
Asset tracking devices may benefit from using the “ADR Optional CP” as sometimes they may need to self-manage their data-rates; e.g., while mounted on a vehicle that is currently moving.
The SF12 plan (if visible) is intended to be used for handheld network survey devices, as excessive SF12 use can reduce the channel availability for other end-devices.
DevAddr In the DevAddr dropdown list: By default, “Allocated by the network server” is selected. This is the default behavior of the OTAA device having its DevAddr generated by the join procedure. Each device is associated with a 4 byte device address that is unique to the network - and will be used by the network when sending and receiving messages. In OTAA mode, it will automatically be assigned, so leave this setting as “Allocated by the network server”.
Application server routing profile Select the route to use for the uplinks sent by your end-device, to the Application Server (endpoint) that will ingest the device’s messages.
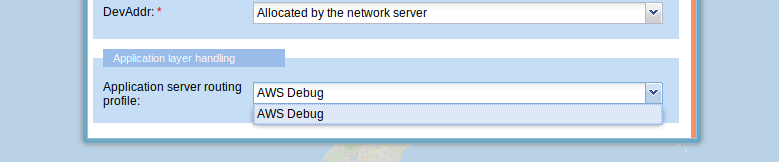
Do Not Leave this Field Empty
Messages to/from your devices will not be displayed within Wireless Logger unless you set up a Routing Profile – it can be nearly anything, and you can modify/replace it later.
Once all required fields have been completed, then click the Create button to complete the provisioning process for the new device.
Using Wireless Logger
See the uplinks from your device, and the downlinks to your device – and these are delivered via Spark LoRaWAN to the ThingPark Wireless platform. Analysis of these traces may require intimate knowledge of the relevant LoRaWAN technical specifications, which are available from:
The following figure is an example of a trace of a device that’s under development.
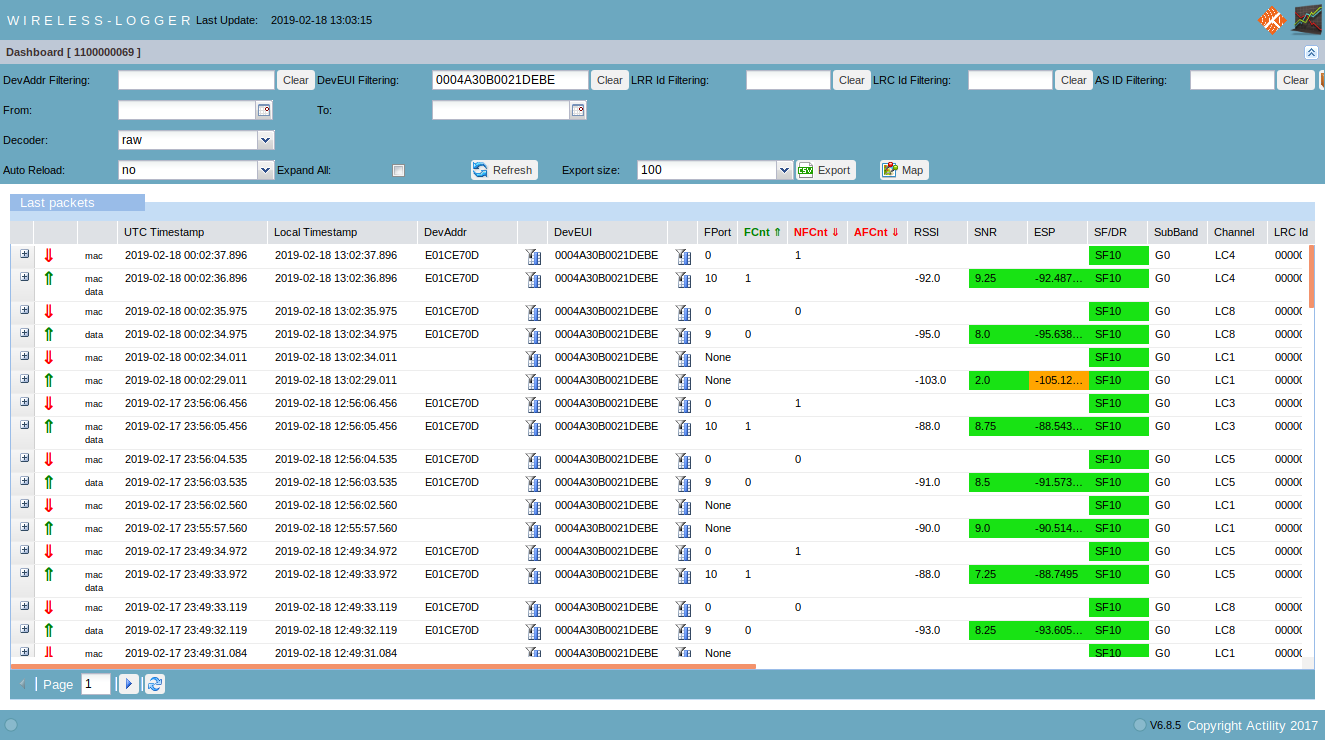
Being able to see the flow of messages is invaluable when figuring out what the device is up to.
TPW Network Survey Application
Upon request, the Network Survey application can be added to your subscriber account. This application is useful when performing network surveys, and then for storing and also exporting the survey data. For example, the following figure shows the results obtained using an Adeunis FTD network survey device:
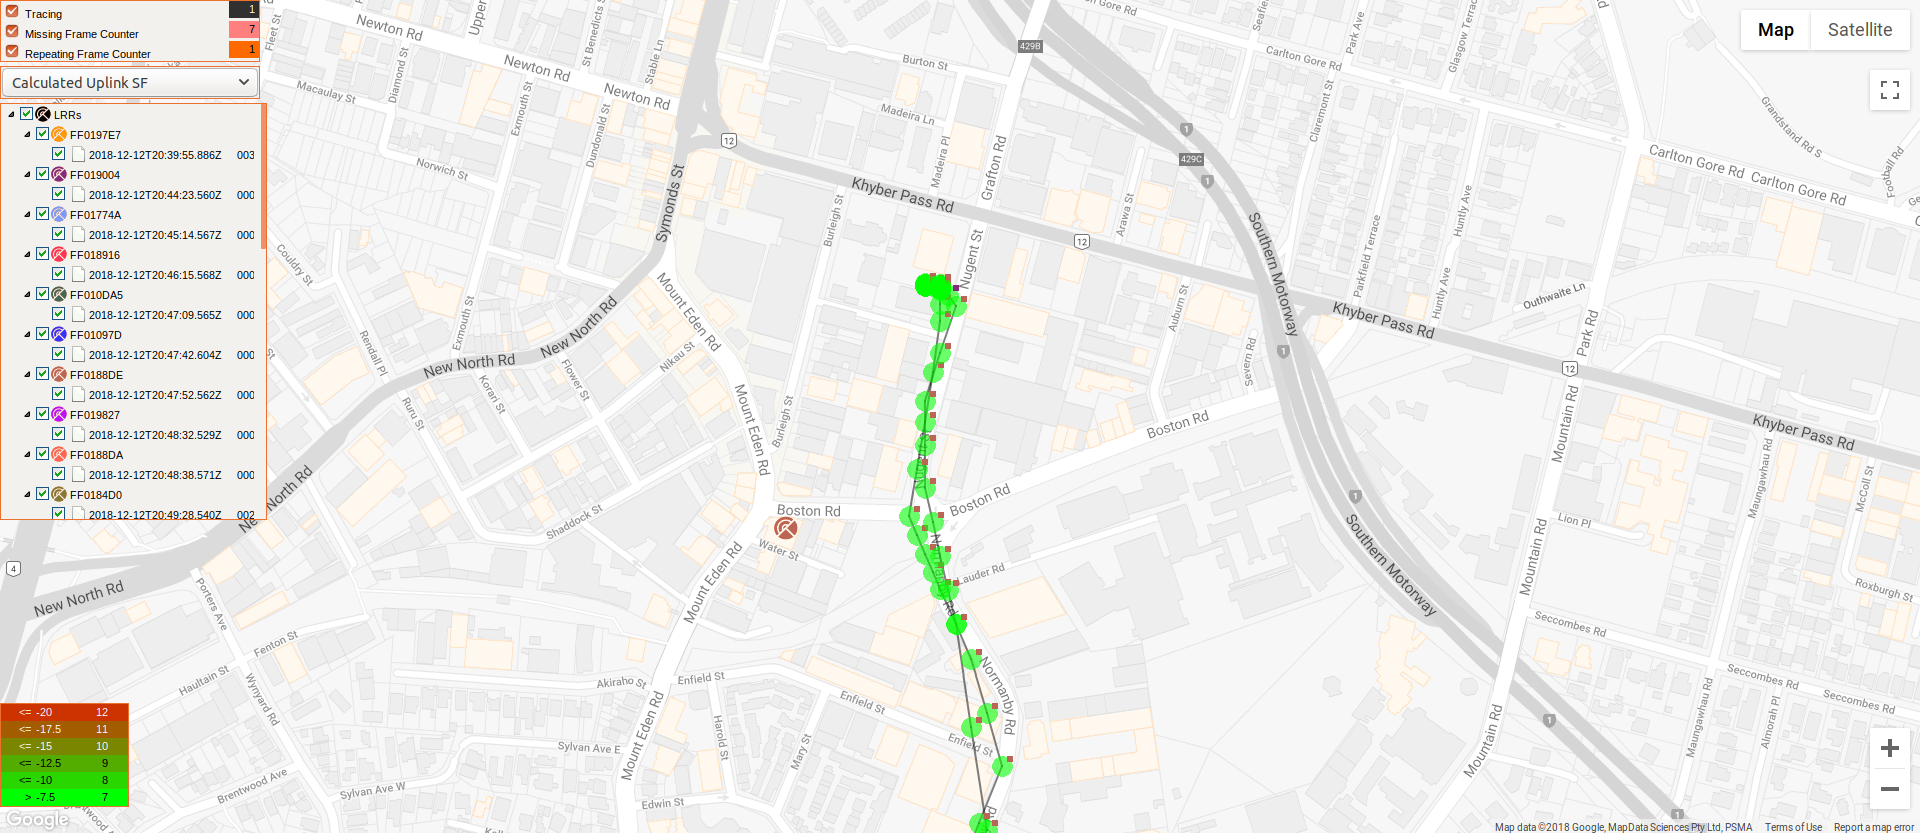
The Adeunis FTD was set to transmit an uplink using a 10 second update-interval, as a car was driven towards Nugent street. Upon arriving, a few more minutes was spent within the area, to gain further data. The green dots show that the LoRaWAN signals from the Adeunis were clearly received by the neighbouring gateways, and that the signal strength in this area is very good.
LoRaWAN Network Survey Devices
A compatible LoRaWAN network survey device is required to use the ThingPark Network Survey application. Devices that are support by the Network Survey application, and that also have suitable AS923 versions, include:
- SemTech LoRaMote v1
- MultiTech mDot BOX
- Adeunis FTD
Multitech mDot BOX
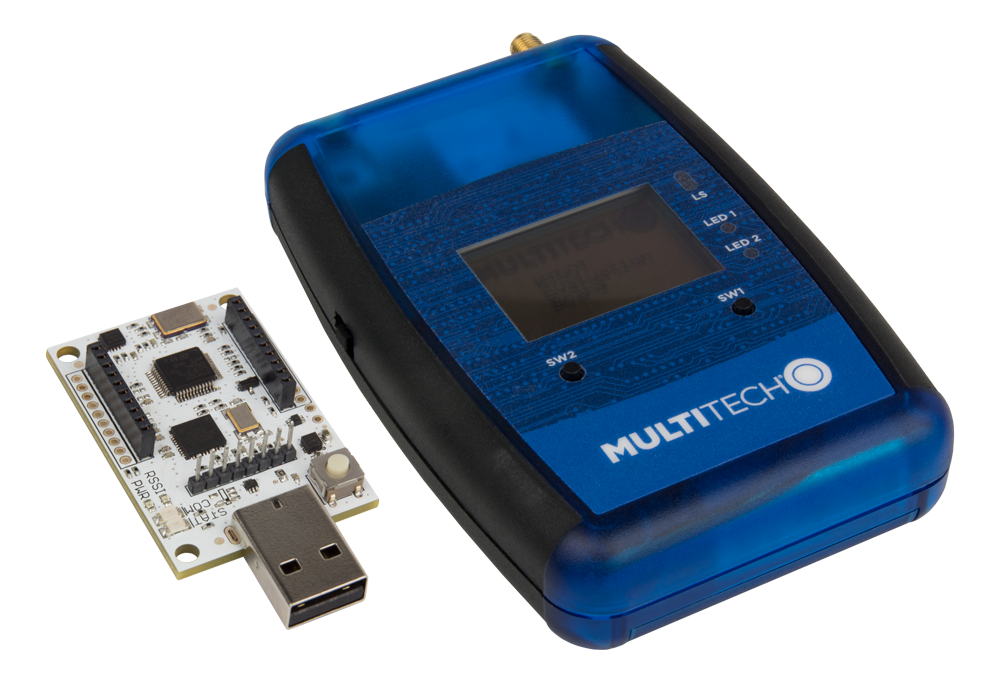 Not only useful as a network survey tool, the Multitech mDot BOX also makes a great evaluation and development board. The mDot BOX is built around a standard Multitech mDot LoRaWAN module but with addition hardware including:
- temperature and humidity sensors;
- onboard GPS;
- a 108x64 pixel LCD display;
- two user buttons; and
- an enclosure which also houses a 9V battery.
The device firmware runs the Mbed RTOS and sourcecode is provided for the entire project, except for the LoRaWAN MAC-specific firmware.
Further Information
AS923 versions of Multitech mDot BOX devices are available from Arrow Electronics, in NZ. Additional sources of information include:
Adeunis FTD
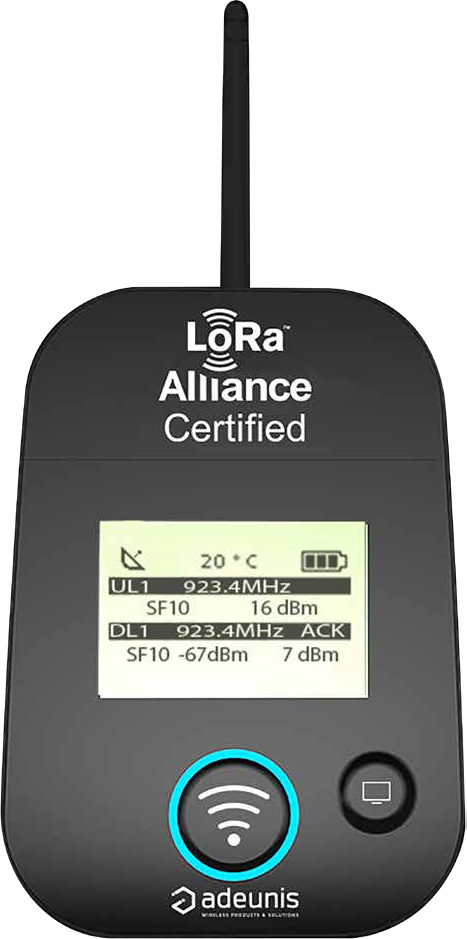 The Adeunis FTD (Field Test Device) is an easy to use survey tool, available for AS923 regions, can be recharged via (micro-B) USB, and supports ranges of over 15 km to the nearest LoRaWAN gateway.
Further Information
The AS923 version of the Adeunis FTD is available from several retailers in NZ, and the following links provide information about this device, and its use:
The Network Survey application will not have been added to a subscriber’s account unless we have been asked to add this to their account, along with a Connectivity Plan (CP) that is suitable for network survey devices.↩︎
There are also some additional provisioning guides for popular AS923 LoRaWAN development & evaluation modules, and these are linked to from our section on LoRaWAN Evaluation Boards.↩︎