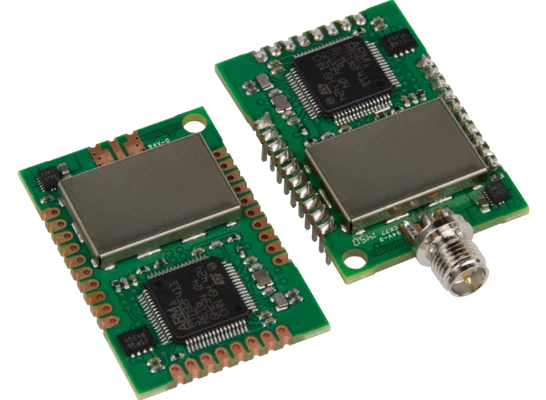
MultiTech mDot™
Introduction
The MultiConnect™ mDot is a secure, CE/FCC/RCM certified, ARM Mbed programmable, low-power RF module that provides long-range, low bit rate M2M data connectivity to sensors, industrial equipment and remote appliances. It provides bi-directional data communication up to 5 km line-of-sight and 2 km into buildings, using sub-GHz ISM bands in North America, Europe, Australia and Asia Pacific (AS923).

MultiTech mDots bring intelligence, reduced complexity and a lower overall bill of material cost to the very edge of the network while supporting a variety of electronic interfaces to connect just about any “Thing” for years on battery power.
Features
- FCC/CE/RCM certified for use in North America, Europe and Australia
- LoRa Alliance CertifiedTM
- 2-way duplex communication, ideal for emergency or mission-critical applications
- Multiple I/O interfaces for connecting almost any “thing”
- Data rates 293bps - 20Kbps + LoRa®
Getting Started
The following sections will guide you through the steps needed to connect your mDot using Spark LoRaWAN. These sections cover:
Updating the Firmware – to the latest AS923 version provided by MultiTech.
Setting the Initial mDot Configuration – which will set the network parameters, as well as set the values needed to generate the necessary encryption keys, for securely sending message.
Verify and Take Note of the Device Parameters – as several of these values will be needed for configuring the network activation method for your mDot.
Provisioning the mDot – so that it can connect to the network and begin sending and receiving messages.
Update the Firmware
Before it can be provisioned in our network, the device needs to be flashed using the AS923 firmware. The file can be downloaded here:
After downloading the file, insert the mDot into your PC/Mac and you will see it as one of the device (named MULTITECH) in your filesystem/Finder window. Updating the firmware is as easy as drag and drop into that device.
AS923 Rejoin Bug
Earlier firmware versions of the MultiTech mDot and xDot firmware had a problem where attempts to rejoin the network would fail. But this has been fixed for Multitech firmware releases from v3.1.0 onwards; i.e, this version is capable of rejoining the network by issuing an AT+JOIN . This problem was due to a bug in the upstream LoRaMAC code that affected nearly all devices and manufacturers.
Configuration
The section will guide you through the setps required to get your mDot ready to begin sending and receiving messages. You will need to use a serial terminal to connect to, and then configure the mDot. This is to set the mDot’s network parameters, including the values needed to generate encryption/session keys. There will be separate instructions for the following operating systems:
though these instructions will be fairly brief. You are encouraged to find more complete sources of information if this is completely new to you.
Once you have connected to the mDot using a suitable terminal emulator, then the remaining steps will be the same for each operating system.
Mac OS Instructions for Connecting to an mDot
To connect to your mDot via a USB-to-serial port connection:
Open a terminal
Execute the following command:
$ ls -lhat /dev/tty*You should see something that includes an entry of the form:
/dev/tty.usbmodem14121Connect via serial using the
screenprogram:$ screen /dev/tty.usbmodem14121 115200
The screen command-line tool is probably not be the easiest terminal emulator to use. Before launching it, you can execute:
to find out a little more about it. In particular, it is not obvious how to exit from a serial terminal session. There are many other terminal emulators to choose from, but they may not already be installed on your system.
GNU/Linux Instructions for Connecting to an mDot
To connect to your mDot via a USB-to-serial port connection:
Open a terminal
Execute the following command:
$ ls -lhat /dev/tty*You should see something that includes an entry of the form:
/dev/ttyXRUSB0Connect via serial using the
screenprogram:$ screen /dev/ttyXRUSB0 115200OR, connect using the
minicomprogram:$ minicom -D /dev/ttyXRUSB0 -b 115200
but you may have to install minicom first. To do this on Debian-derived systems, issue the following command:
Windows Instructions for Connecting to an mDot
You may need to first download and install a suitable terminal emulator. The are many excellent options to choose from, and we use several of these. But a good choice would be Tera Term:
as it is open source and free. You will need to configure the COM port to use, and what COM port corresponds to your mDot may be system-dependent. You should probably also set the baud rate to 115200, in case auto-detection fails.
Configuration using AT Modem Commands
As you should now be inside the AT command prompt, you are ready to configure the device. Type AT into the serial terminal, and if there is no OK response, you should reset the mDot, which is the small white button on the device – by the USB connector. After being reset, the AT command should now result in an OK response if everything is functioning correctly.
An introduction to the commands for the mDot AT modem interface can be found here:
Execute the following commands to configure your mDot to use OTAA (“Over-The-Air Activation”), when connecting to the network:
# public network
> AT+PN=1

# set frequency sub-band
> AT+FSB=1

# turn Adaptive Data Rate ON
> AT+ADR=1

# turn ON verbose mode
> ATV1

# TX data rate - DR2 - SF8BW125
> AT+TXDR=2

# Debug log level - TRACE – Output TRACE and all lower level debug messages
> AT+LOG=6

# save changes
> AT&W
where > represents the input prompt (if any) of your serial terminal.
Device Parameters
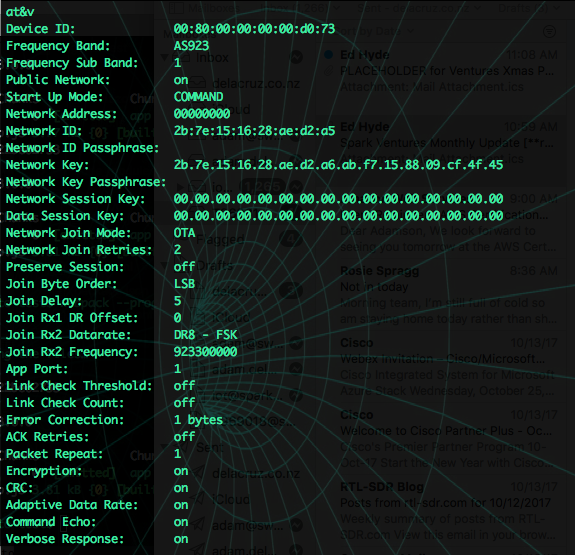
To obtain the mDot’s DevEUI, and other parameters, so that you can enter it into the Actility ThingPark portal, enter the following command.
This will give you the following result as shown in Figure 2. Note the Device ID as your DevEUI.

AT&V command when connected to the MultiTech mDot via a serial terminal link. This assumes that the mDot is running the default AT+Modem firmware.Network/Application ID’s and Keys
New mDot devices do not have the Network ID and Network Key set, and default to all zeros. To set these to the values shown in Figure 2:
with the final command being used to store these settings. Also to note is that while MultiTech calls these values Network ID and Network Key, other providers/services/platforms may call these AppEUI and AppKey, or similar.
Provisioning the Device
The page on Device Provisioning walks through the steps required to add the newly setup mDot to the Spark LoRaWAN network. The AT&V command (with output shown in Figure 2) provides the information for the DevEUI, AppEUI, and AppKey needed by ThingPark Wireless (noting that the MultiTech mDot uses different names for these fields/values). Once provisioned, test that the device can join the network using:
The device may not succeed in joining on its first attempt, so just wait a couple of minutes and try again (or use ATZ to restart the device, wait a few seconds), using AT+JOIN. TPW Wireless Logger can be used to view the sequence of messages, their payloads, and to understand how the network connection process works.
Page Links
For convenience, the useful links have been gathered together: