RAK811 Wisnode
Introduction
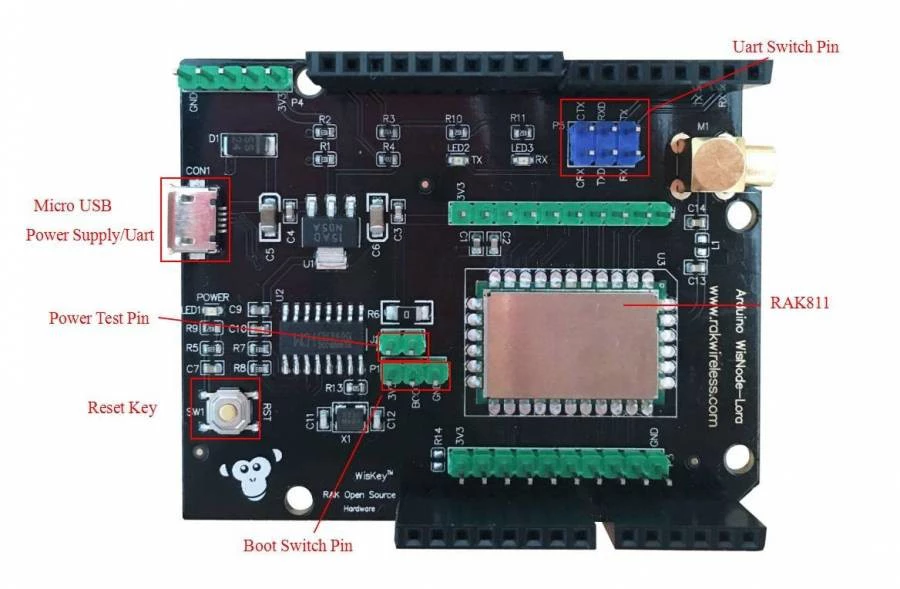
The RAKWireless RAK 811 is low-cost lora node board based on the SX1276 semtech module and a STM32 host. It has an AT command based firmware running on it out of the box that supports a wide variety of operations. The board can be used along with an Arduino UNO as well via the serial port . Figure 1 shows the RAK WisNode LoRa with RAK 811 module.

Board Jumper Settings
When using with the PC have the jumper between CRX - TXD and CTX - RXD as in the pic above. If your using with an arduino have the jumper between TXD - RX and RXD - TX.
Features
- Long-Range, Low-Power LoRaWAN and operating in either the 868 MHz or the 915 MHz frequency bands
- LoRa Point-to-Point communication in the 860MHz-1020MHz frequency range
- Small size and low power
- High Receiver Sensitivity: down to -146 dBm
- TX Power: adjustable up to +14 dBm high efficiency PA, max PA boost up to +20dbm
- FSK, GFSK, and LoRa Technology modulation
- IIP3 = -11 dBm
- Up to 15 km coverage/range in rural and suburban environments, and up to 5 km of coverage within urban areas
- Semtech SX1276 transceiver
- ST Microelectronics STM32L151 ARM Cortex-M3 microcontroller
- Arduino-compatible pinout and form-factor
- 22x14 mm footprint for the RAK811 module
Getting Started
Depending on where you sourced your RAK811 evaluation board from (and when), you may need to upgrade its firmware, to use a recent AS923 firmware version. Upgrading the firmware of your RAK811 is easiest using a Windows-based computer, so that you can use the utility provided by ST Microelectronics. If using Mac OSX or GNU/Linux, and you have a working Windows virtual-machine image available, then this can be easily used as well.
When you have a suitable version of AS923 firmware running on your board, then you can connect to it using a USB serial-port connection. This will be required to configure the board to use OTAA when joining Spark’s network, and then to actually join, and beginning sending and receiving data.
Update the Firmware
Depending on the type of module, it may be using a firmware for EU868, US915, etc. You need to install an AS923 firmware image. RAK Wireless has a firmware available for this module running AS923. The latest (AS923) firmware image, a (Windows-only) utility for flashing the RAK811, and instructions for updating the firmware, can be found at the following locations:
- RAK811 Firmware from the Github Repository
- STM32 Flash loader demonstrator (UM0462)
- WisNode-LoRa – Upgrade Firmware
Once you have the downloaded the firmware, the ST Microelectronics Flash utility, and then upgraded the firmware to a suitable AS923 version then you are ready to provision and connect your RAK811.
AS923 Firmware and RAK811 Setup
Make sure that you have updated to a firmware image for Spark’s AS923 LoRaWAN, and you will also need to be sure to set the device to AS923 during provisioning.
Provisioning the RAK811
We provide general instructions for device-provisioning using ThingPark Wireless, and you will be required to have (and enter) some values that are specific to your device, and its configuration:
- DevEUI – 64-bit unique, device ID;
- AppEUI – 64-bit ID for the end-point application/payload; and
- AppKey – 128-bit key for generating session-keys for encryption of application payloads,
to complete this process.
Connect Device
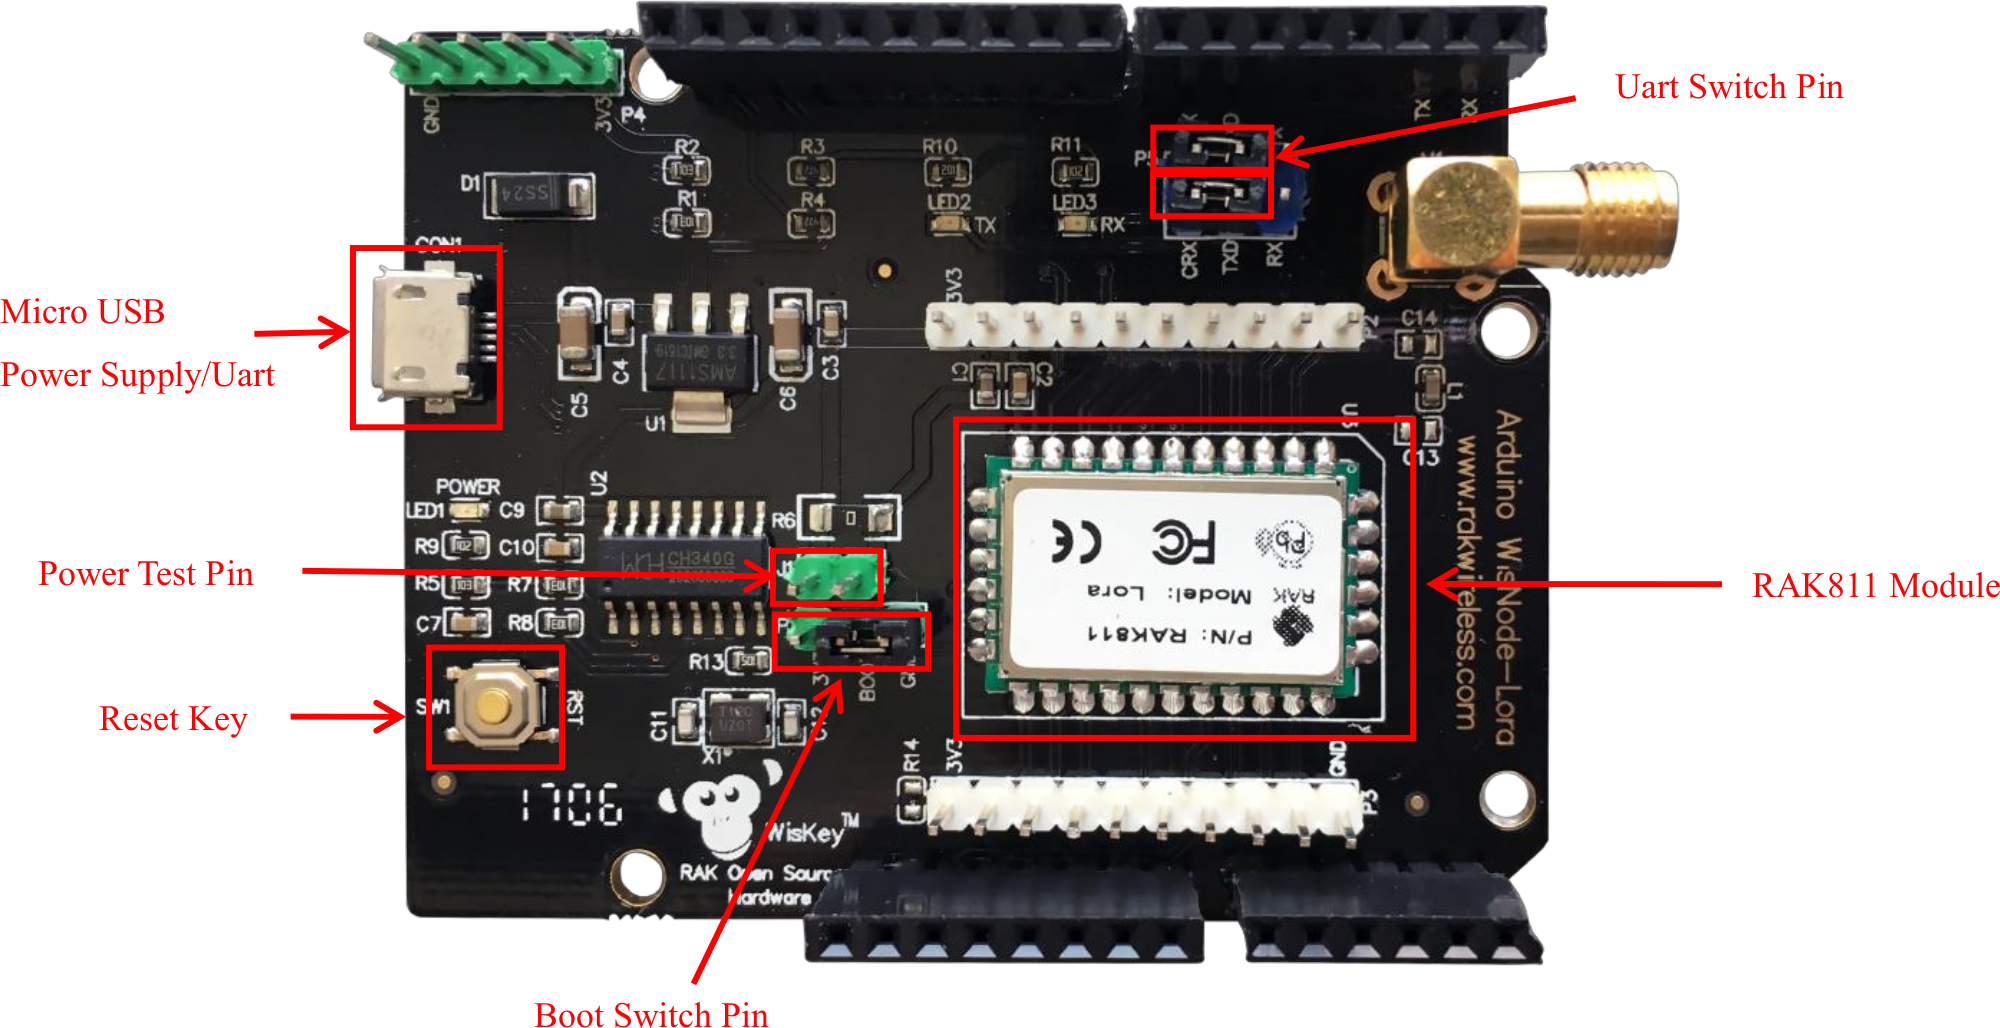
Figure 2 shows how the jumpers should be set to configure your device for communication with your computer, using (UART serial over) USB.

With your board set up (as shown), then use the following instructions, depending on your computer’s Operating System (OS):
Windows
We use the Tera Term terminal emulator, whereas the RAK Wireless guides use the CommUart Assistant v3.8 utility, to communicate with your RAK811 using a USB serial-port connection:
and you will need to determine the correct COM port, and configure it appropriately.
Mac OSX
As of this writing, the device driver for the RAK WisNode LoRa is not included on mac book pro so you need to manually download and install it.
First, you need to have homebrew to install the driver. (https://brew.sh/) Then execute the following commands
$ brew tap mengbo/ch340g-ch34g-ch34x-mac-os-x-driver https://github.com/mengbo/ch340g-ch34g-ch34x-mac-os-x-driver
$ brew cask install wch-ch34x-usb-serial-driver
With your board set up (as shown in Figure 2), then perform the following steps:
- Restart the machine, open terminal
- Execute this command ls -lhat /dev/tty*
- You should see the
/dev/tty.wchusbserial1410or something similar.
Ubuntu
With your board set up (as shown in Figure 2), then launch a new command-line terminal. Then from the command-line, start a suitable terminal emulator, for example:
assuming that you WisNode RAK811 enumerated as /dev/ttyUSB0.
Adding a user to the dialout group:
and you will have to restart your session for the changes to become active.
The RAK811 requires both carriage-return (CR) and line-feed (LF) characters to be sent, to mark the end of an AT command. You will likely have to set you terminal emulator up to generate the LF, as this is not standard – minicom allows you to generate these explicitly by pressing CTRL-M, followed by CTRL-J.
RAK811 Configuration
The following setup guide is based heavily on that from:
- Firstly, enter:
to enter into device-setup mode, and where the > represents AT commands that you will need to enter, and the rest of the lines are the expected output.
- Then query/check the RAK811’s DevEUI:
where 3037343644357402 is an example of a device’s DevEUI.
- Now you will need to set a AppEUI and an AppKey (and make sure that they match the values that were used during provisioning), for example:
and these values will work, and they can be changed later, by entering device-setup mode again.
If you have completed the provisioning steps, then you should now be able to connect to Spark LoRaWAN and begin sending & receiving messages.
Network Join and Messaging
To issue a JoinRequest MAC command, to initiate a network-join procedure, then enter the following AT command:
and upon a successful join, you can now begin to send messages:
where the first at+send gives the basic form of the transmit command, and then the second at+send is an example that will transmit 00aa5500 to the ThingPark Wireless LRC1, and on to you Application Server if you have set one up.
The response that you will receive; e.g., at+recv=2,0,0 above, will depend on what the LRC sends to your end-device. Use Wireless Logger to see the message-trace for what was processed by ThingPark Wireless, and Wireless Logger can be an invaluable tool for diagnosing problems with LoRaWAN end-devices.
Pushing Downlinks to the RAK811
Using the command-line; e.g., using Mac OSX or GNU/Linux, it is straightforward to send downlinks to your RAK811; e.g., using the curl utility. E.g.,
Now that basic AT-modem functionality is working, you may want to try out some RAK811 demo projects. We also have information for getting set up to develop AS923 firmware, for several toolchains and development environments.
Page Links
For convenience, the useful links have been gathered together:
- RAK811 Firmware from the Github Repository
- STM32 Flash loader demonstrator (UM0462)
- WisNode-LoRa – Upgrade Firmware
- Brew for Mac OSX
- Tera Term for Windows
- Github project for the RAK811 device
- Github project for the RAK811 LoRaNode development board firmware
- RAK Wireless Documentation for the RAK811
- Demo projects for the RAK811
LRC is an acronym for “Long Range Controller”, which is Actility’s name for their LoRaWAN Network Server (NS).↩